

You’re staring at a stack of brand-new pavers, a hired plate compactor and a sunny weekend forecast. How hard can it be? Plenty of Sydney homeowners tackle small patio or pathway projects themselves, only to find uneven surfaces, drainage dramas or cracked edges appearing months later—alongside a hefty repair bill. Before you break ground, take five minutes to understand the pitfalls that quietly torch budgets. From skipping compaction to underestimating stormwater rules, here’s how to dodge the errors that send DIY costs soaring (and when to call in professional paving support instead).
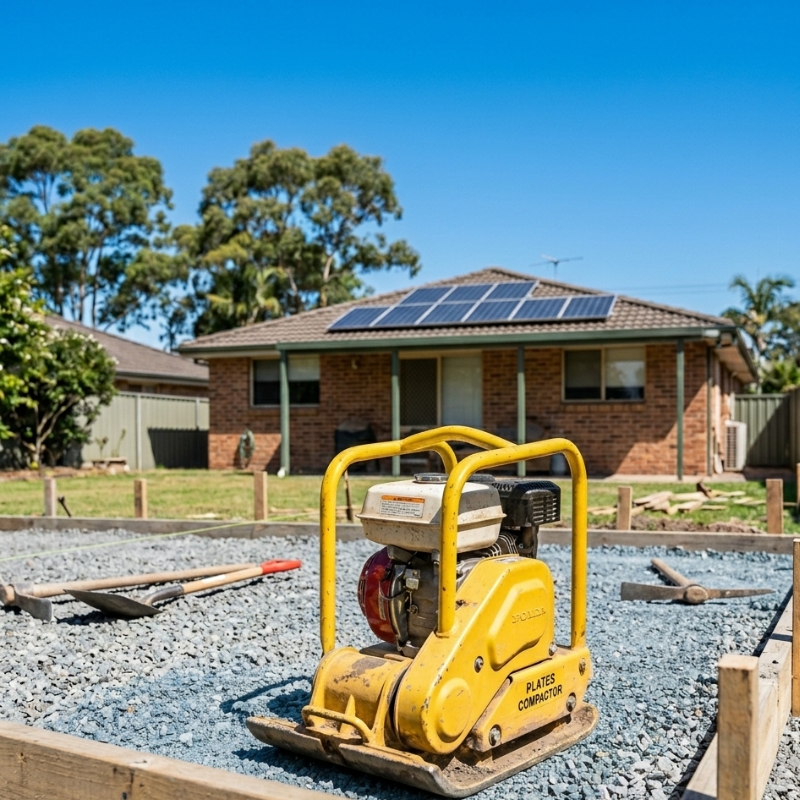
1. Rushing the Base Preparation
A flawless paved surface starts below ground level—literally. Yet hurried DIYers often:
- Remove too little soil
- Fail to level properly
- Skip sub-base compaction
Why It Matters
Sydney’s clay-rich pockets (think Western Suburbs) swell and shrink with rainfall. Without a firm, compacted base, pavers shift, creating ankle-twisting trip hazards.
Practical Fixes
- Excavate at least 100 mm below finished height for light foot traffic zones.
- Add crushed rock (DGB20 or equivalent) in 50 mm layers, compacting each pass.
- Test firmness: Jump on the base—if it crunches or leaves a footprint, keep compacting.
2. Ignoring Proper Drainage and Slope
A perfectly flat patio looks great… until the next East Coast low arrives. Pavers must have a 1:80–1:100 fall away from structures to shed water effectively.
Local Context
Many Sydney councils tie paved-area runoff to stormwater management plans. Building non-compliant surfaces can invite rectification notices.
How to Get It Right
- Use a string line, spirit level or laser to set consistent fall.
- Direct water toward garden beds, strip drains or lawful discharge points.
- Check council guidelines or the NSW Fair Trading building and renovating guide if you’re unsure about legal obligations.
3. Choosing the Wrong Bedding Sand or Thickness
Coarse river sand drains well beneath pavers, but homeowners sometimes grab whatever’s cheapest at the big-box hardware store.
Common Issues
- Fine beach sand holds moisture, weakening the bed.
- Inconsistent 20 mm in one corner and 40 mm in another leads to rocking pavers.
Safer Approach
- Use washed coarse river sand (particle size 4 – 5 mm).
- Screed to a consistent 25–30 mm depth.
- Compact lightly before laying pavers to remove voids.
4. Skipping Edge Restraints
Paver edges without concrete edging, sleepers or metal strips migrate outward over time, opening tyre-catching gaps on driveways or patio edges.
Warning Signs
Early spreading is subtle: a 2 mm gap today, a 10 mm canyon by Christmas.
What to Do
- Fit a concrete haunch or metal edge after laying and compacting the field.
- Backfill against the restraint for extra support.
5. Mismatching Paver Types or Batches
On clearance, 200 × 100 mm clay pavers look like a bargain—until you try to blend them with concrete stepping stones.
Hidden Costs
- Irregular thickness forces constant re-bedding.
- Colour inconsistencies become obvious after sealing.
- Extra cutting labour chews up hire periods.
Buying Smart
- Order the full quantity (plus 10 %) from one batch number.
- Stick to a single material type where possible.
- Lay pavers randomly from multiple pallets to spread subtle variations.
6. Undercompacting After Laying
You’ve laid the last paver—job done, right? Forgetting the final plate-compactor pass can see joint sand wash out and individual pavers sink.
When to Compact
Run the plate compactor with a rubber mat or carpet underlay once the field is laid and before sweeping in joint sand. Two light passes are usually enough.
7. Using Ordinary Sand in the Joints
Plain brickie’s sand invites weed seedlings and ants. Polymeric or kiln-dried jointing sand locks together once wet, cutting maintenance time.
Quick Comparison
| Joint Filling Option | Up-Front Cost | Weed Resistance | Ease of DIY | Hidden Cost If It Fails |
| Ordinary brickie’s sand | Low | Poor | Easy | Frequent sweeping & refills |
| Kiln-dried fine sand | Moderate | Fair | Moderate | Annual top-ups in high-traffic areas |
| Polymeric locking sand | Higher | Good | Easy (requires misting) | Harder to remove if repairs are needed |
8. Forgetting to Seal (or Choosing the Wrong Sealer)
Sydney’s UV levels fade unsealed coloured concrete pavers quickly. Meanwhile, porous sandstone sucks up red wine spills at the first weekend barbecue.
Sealing Tips
- Wait 4–6 weeks for new pavers to cure.
- Choose solvent-based acrylic for colour enhancement or penetrating sealer for a natural look.
- Re-apply every 2–3 years — earlier if the surface shows dull patches.
9. Overlooking Safety Gear and Heavy Lifting Technique
DIY paving isn’t just about aesthetics—it can become a weekend in the emergency room.
Common Oversights
- No knee pads, leading to bruising and discomfort.
- Bare-handed handling of rough concrete edges—hello cuts and callouses.
- Unassisted lifting of 20 kg paver packs, injuring lower backs.
Safer Practices
- Wear steel-capped boots, gloves, eye protection and ear muffs around cutters and compactors.
- Lift with your legs or use lifting clamps.
- Keep kids and pets clear of the work zone.
10. Underestimating Ongoing Maintenance
Even a perfect DIY job needs upkeep. Neglecting simple tasks shortens paver’s life and drives up future spending.
Annual To-Dos
- Inspect for low spots after heavy rain.
- Rake out moss or algae on southern-facing paved areas.
- Top up joint sand if levels drop below 3 mm from the surface.
Handy Inspection Checklist
- Are any pavers rocking underfoot?
- Do joints have missing or loosened sand?
- Is water pooling after five minutes of steady hose spray?
- Are there early signs of surface cracks, sinking or wobbles? If yes, see the early signs your paved surface is failing for the next steps.
Hidden Costs at a Glance
Below is a quick reference table that shows how seemingly small errors balloon into wallet-draining fixes.
| DIY Mistake | Typical Rework Needed | Stress Level |
| Skipped base compaction | Lift, re-excavate, add gravel, relay | High |
| Wrong slope | Break out and relay the entire section | High |
| No edge restraint | Install haunch and relay edges | Moderate |
| Ordinary joint sand | Weed control and joint refills every 3–6 months | Moderate |
| No sealing | Colour fading and staining removal | Low |
Frequently Asked Questions
1. Can I lay pavers straight onto dirt for a small path?
It’s tempting, but soil shifts with moisture and organic activity. Even a 600 mm garden stepping path lasts longer on a 50 mm compacted road-base layer with a 25 mm bedding sand cushion.
2. How far away from my house walls do I need to fall?
Aim for roughly 10–12 mm drop per metre (1:80–1:100). This subtle slope directs rainwater away from footings without looking obviously angled.
3. Do all pavers need sealing in Sydney?
Porous materials like sandstone and coloured concrete benefit most. Dense basalt or porcelain may cope unsealed, but sealing still cuts cleaning effort and staining risk.
4. My patio is already laid, but water pools in one corner. What now?
Options include drilling core holes to install strip drains, lifting low sections for re-bedding, or adding deck-style platforms. Ignoring persistent puddles accelerates moss growth and slab movement.
5. How soon can I park my car on the newly paved driveway sections?
For concrete pavers on a properly compacted base, wait at least 48 hours after final compaction. Heavy vehicles may require 72 hours to ensure bedding sand has settled.
Final Thoughts
Tackling your own paving can be hugely satisfying, but the devil is in the preparation. By planning drainage, compacting each layer and investing in decent joint sand, you’ll avoid the costliest pitfalls—saving yourself rework, frustration and Monday-morning phone calls to fix-up crews. If, despite best efforts, problems keep resurfacing, it might be time to lean on professional insight for a long-term solution.